

Configuring bundle options
Define the choices inside a bundle — option products, prices, included vs. add-on, and how many a rep must pick.
Overview
Section titled “Overview”Options are the choices a rep makes inside a bundle. Each option holds one or more option products and a configuration that controls how the rep picks from them. This article covers adding options, setting their prices, and choosing whether each is an included or add-on option.
Prerequisites
Section titled “Prerequisites”- An Admin role in Quotivity Studio
- A bundle with a bundle header already set
- Open the bundle. In Quotivity Studio, go to Configurable Products → Bundles and open the bundle you want to configure.
- Add an option. Create a new option and give it a clear name — something a
rep will recognize, like “Support tier” or “Choose your plan.”
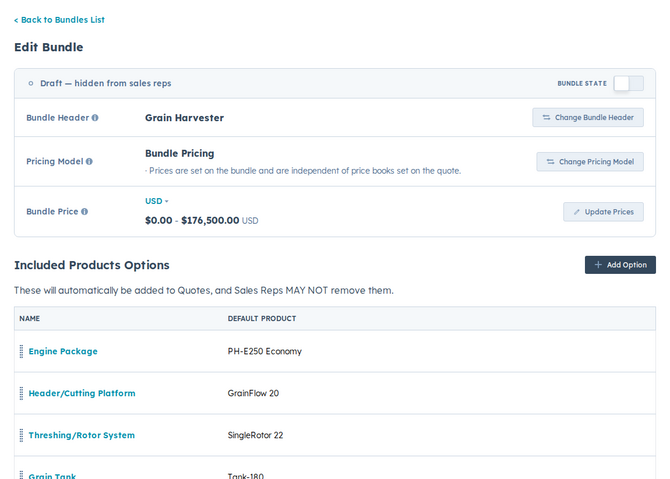
- Add option products. Add one or more products to the option. When an option has several products, the rep chooses among them; when it has one, that product is the option.
- Set the configuration. For an included option, choose the default
product — the one added automatically when the bundle joins a quote (it must
be one of the option’s products). Decide whether reps can select multiple
products from the option, and set the quantity range each product can take.
Default Qty, Min Qty, and Max Qty accept fractional amounts such as
0.5, and every quantity must be greater than zero. Leave Min Qty or Max Qty empty — or clear a value you set earlier — to leave that side of the range unlimited. - Set option product prices. Give each option product its price within the bundle. New option products start at zero, so set the price you want reps to see before activating.
- Mark included or add-on. Choose whether the option is included — added automatically when the bundle expands — or an add-on the rep adds only when the customer wants it.
- Enable or disable options. Turn an option on to make it available, or off to hold it back without deleting it.
- Reorder options. Drag a row in the Included or Add-On table to change where that option appears on quotes and in the Bundle Configurator. The new position saves as soon as you drop the row.
- Optionally set an icon (Enterprise Bundle Configurator). Icons help reps recognize options in the Configure Bundle panel. See Setting icons and images for the Bundle Configurator.
When every option has its products, prices, and type set, the bundle is ready to activate.
Example
Section titled “Example”For a “Choose your plan” option, add the Basic, Pro, and Premium plan products, set Pro as the default product so the bundle starts with a plan selected, and mark the option included so it’s always part of the bundle. For a separate “Onboarding” option, add the onboarding product and mark it an add-on so reps add it only when needed.
- Group related products into a single option rather than spreading them across many — it keeps the rep’s choices clear.
- Name options for the decision the rep is making, not the products inside them.
Troubleshooting
Section titled “Troubleshooting”An option product shows up without a name or price
Section titled “An option product shows up without a name or price”The bundle editor still lists option products that Quotivity stored, even when the matching HubSpot product is missing — for example after the product was deleted or archived in HubSpot. Those rows keep their quantity and other bundle settings, but name and catalog details are blank and pricing shows as empty (not available in the effective price book).
To repair:
- Confirm the product still exists in HubSpot (and is not archived).
- If it was deleted, remove the orphaned product from the option, then add a current HubSpot product in its place.
- If the product was restored or un-archived, reopen the option — details and pricing should load again once HubSpot returns the product.
- Re-check the option’s default product and prices before activating the bundle.
Leaving an orphaned product on an included option can also break quote expansion for that bundle until you replace or remove it.
Related articles
Section titled “Related articles”Ask the help center
Answers come from these guides, with links to the articles used.
Ask anything about configuring quoting in Quotivity Studio.