
Setting quote expiration and default domain
Set how long new quotes stay valid and which domain buyers open them on, in one place in Quote Builder settings.
Overview
Section titled “Overview”Two Quote Builder settings shape how your published quotes reach buyers: the default expiration, which sets how long a new quote stays valid, and the default domain, which sets the web address buyers open the quote on. Setting both gives every new quote a sensible deadline and an on-brand link without the rep having to think about it.
Prerequisites
Section titled “Prerequisites”- An Admin role in Quotivity Studio
- At least one secured domain available, if you want quotes served from your own domain — see Setting up a custom domain
- Open Settings. In Quotivity Studio, go to Settings and choose the
Quote Builder tab.
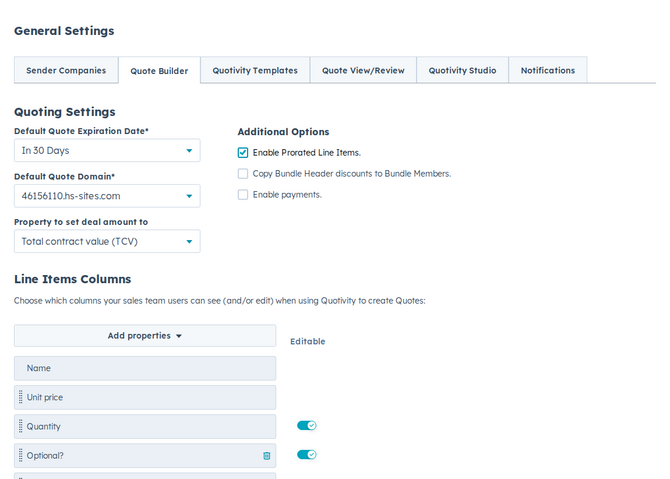
- Set the Default Quote Expiration Date. Open the Default Quote Expiration Date menu and choose how long new quotes stay valid: 30, 60, 90, 120, 180, or 365 days from creation.
- Set the Default Quote Domain. Open the Default Quote Domain menu and choose the domain your published quotes are served from. Only domains that are set up and secured appear here.
- Confirm your changes saved. Settings save automatically. New quotes now start with your chosen expiration window and publish on your chosen domain.
Examples
Section titled “Examples”- A team with a 30-day sales cycle sets expiration to In 30 Days so quotes create urgency and stale pricing doesn’t linger.
- A company that set up
quotes.acme.comselects it as the default domain so buyers always open quotes on an Acme-branded URL.
- The expiration here is the starting point for new quotes; a rep can still adjust the date on an individual quote.
- Expiration controls access to the public quote page. For Quotivity-template quotes, the PDF download from View Quote and the deal quote card remains available after expiration (including signed PDFs).
- If the domain you want isn’t in the list, it likely isn’t secured yet — finish setting it up first.
- HubSpot-template quotes need a domain to publish. If a quote has none, publish uses this default. With no default and no domain on the quote, Quote Builder asks the rep to choose a Quote Domain before publish.
Related articles
Section titled “Related articles”Ask the help center
Answers come from these guides, with links to the articles used.
Ask anything about configuring quoting in Quotivity Studio.