

Configuring line item columns
Choose the columns used in Quote Builder and quote documents, including custom Liquid columns for tailored output.
Overview
Section titled “Overview”Line items carry a lot of detail — name, quantity, price, SKU, description, tax, billing terms, and more. Quotivity has separate column controls for Quote Builder, Studio administration, and the buyer-facing Line Items module in a Quotivity Template. Enterprise accounts can also create a custom template column with Liquid when a property column cannot produce the required presentation.
Prerequisites
Section titled “Prerequisites”- An Admin role in Quotivity Studio
- Open Settings. In Quotivity Studio, go to Settings → Quoting → Line Item Table Columns.
- Find the Line Items Columns section. This is where you choose which
columns your sales team sees — and can edit — when building quotes.
- Add or remove columns. Check a property to add it as a column; uncheck it to remove it. A few core columns — like Name, Price, and Quantity — are always present and can’t be removed.
- Set which columns reps can edit. For columns that support it, use the editable toggle to control whether reps can change the value in Quote Builder or only view it. Calculated and system values stay read-only.
- Reorder columns. Drag a column to change where it appears, left to right, on the quote.
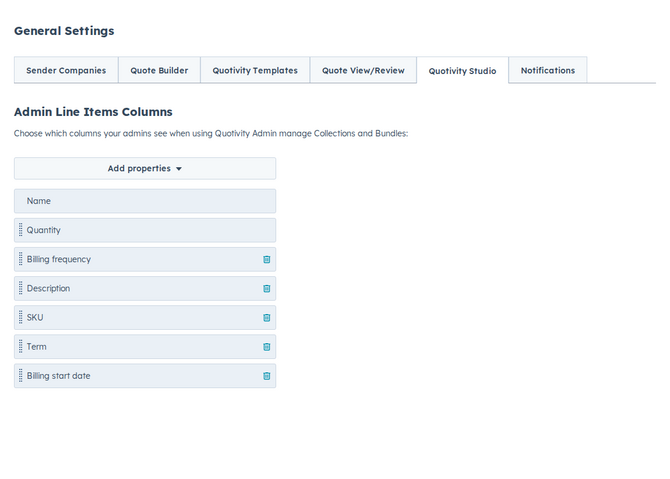
- Configure the admin columns (optional). In the Admin Line Items Columns section, choose which columns you see when managing Collections and Bundles in Studio. This is independent of what reps see.
- Confirm your changes saved. Settings save automatically as you edit. When the columns match what you want, your reps will see the new layout on their next quote.
Configuring columns on a quote document
Section titled “Configuring columns on a quote document”The columns on the buyer-facing quote document are configured separately from the Quote Builder columns:
- Open the quote template. Go to Templates → Quote Templates and open the Quotivity Template you want to change.
- Open the Line Items module. Select its Columns tab.
- Choose the property columns. Add or remove HubSpot line item properties, drag columns into order, and edit each buyer-facing label.
- Choose a numeric format when available. For numeric properties whose display format is not already known, use Column Format to show the value as Currency, Number, or Percentage.
- Choose the layout. Keep a column in the standard table, or move it to Full Width Columns to display it beneath each applicable line item.
- Publish the template. The updated columns now appear on quotes that use this template.
Template columns control the document only. They do not add editable fields to Quote Builder or change the underlying HubSpot line item value.
Adding a custom column to a Quotivity Template
Section titled “Adding a custom column to a Quotivity Template”Custom columns require an Enterprise plan.
A custom column calculates and renders its own content for every line item with HTML and Liquid. Use one when you need to combine properties, add conditional text, or present a value in a way a standard property column cannot.
- Open the column picker. In the Quotivity Template’s Line Items → Columns tab, open Select columns.
- Add the column. Click Add Custom Column at the bottom of the picker.
- Write the column code. In Custom Column Code, enter LiquidJS and HTML.
Use the token picker for
item,quote,company, anddeal. On bundle header rows,memberscontains the bundle’s included member line items so a column can loop through and summarize them. See Custom Code Module (LiquidJS) for tokens, filters, and examples. - Check the syntax result. Fix any Liquid error shown below the editor. You can also ask the built-in AI assistant to draft or revise the code.
- Finish the column. Click Done, rename the column label, and drag it into the required position. You can also move it to Full Width Columns.
- Preview and publish. Load representative sample data, confirm every line item displays correctly, then publish the template.
For example, this formats a net price as US dollars and adds a note when a discount exists:
{{ item.amount | money: "USD", "en-US" }}{% if item.hs_discount_percentage %} <small>{{ item.hs_discount_percentage }}% discount applied</small>{% endif %}Other available money filters, date formats, and debug techniques are covered in Custom Code Module (LiquidJS). Missing properties render as empty values, so test the column with line items that do and do not contain each property.
Examples
Section titled “Examples”- A team that sells subscriptions adds Billing frequency and Billing start date so reps and buyers can see term details at a glance.
- A team that doesn’t want reps changing prices keeps Price visible but leaves it read-only, while making Discount editable.
- A team wants net price displayed as “$1,200 net” instead of the standard
property output, so it creates a custom column that formats
item.amountand appends the label.
- Fewer columns make quotes easier to scan — show only what your buyers need to understand the offer.
- The rep-facing and admin column sets are configured separately, so you can keep internal-only detail out of the buyer’s view.
- Adding or removing the discount column also brings its percentage along automatically, so you don’t have to manage both. On Enterprise, the ramp pricing control lives next to Discount — keep that column visible and editable if reps should configure ramps. See Configuring ramp pricing on a quote.
- When a rep adds a product from the product library, Quotivity copies that product’s values onto the new line item for every property you’ve enabled as a Line Items Columns column — for example Unit Cost, Billing frequency, or a custom product property. Those defaults stay on the line item through later autosaves unless the rep edits them. If a value doesn’t appear after add, check that the property is enabled here and that the HubSpot product itself has a value set.
- A custom column is not a new HubSpot property and does not store a value. It renders from existing quote data each time the document is generated.
- Custom column output is sanitized. Scripts and unsafe markup do not run. Use the template’s HubSpot landing page for broad visual styling.
Related articles
Section titled “Related articles”Ask the help center
Answers come from these guides, with links to the articles used.
Ask anything about configuring quoting in Quotivity Studio.