

Managing users
Invite teammates, set their role, and manage licenses so the right people can build and approve quotes.
Overview
Section titled “Overview”Anyone who creates quotes, approves them, or manages rules and price books needs a Quotivity license. On the Users page you invite teammates, set each person’s role, and turn their license on or off. The number of licenses you can assign is tied to the seats on your plan.
Prerequisites
Section titled “Prerequisites”- An Admin role in Quotivity Studio
- An available seat for each user you want to license
- Open Settings → Users. The Manage Licensed Users page lists everyone
in your HubSpot portal alongside their license status and role. A line near
the top shows how many of your Quotivity seats are assigned.
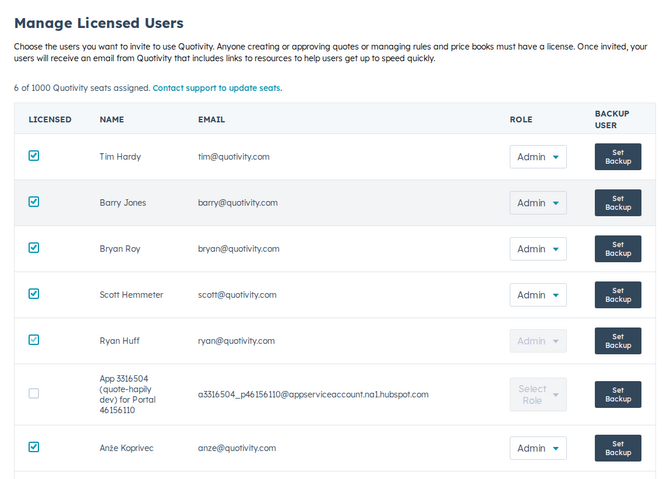
- License a user. Check the Licensed box next to a teammate to give them a seat and invite them to Quotivity. They’ll receive an email from Quotivity with links to help them get started.
- Set their role. In the Role column, choose Admin or Sales Rep. Admins configure Quotivity Studio and can approve quotes; Sales Reps build quotes in Quote Builder. See Understanding user roles.
- Set a default sender company when you have more than one. On Enterprise (and Trial), the Default Sender Company column appears once you have sender companies. Choose the company that should appear when that person creates a quote, or leave Account default. They can still change it on the quote, and a Quote Rule can still override it. See Using multiple sender companies.
- Deactivate a user when needed. Uncheck the Licensed box to remove a user’s access and free up their seat for someone else.
- Confirm the invite. Once licensed, the user can sign in to Quotivity and start working in their assigned role.
- Watch the seats-assigned line — when you’ve used every seat, license a new user by first freeing one up. To raise your seat count, contact support.
- A teammate whose HubSpot email address changed still uses one seat. License the current email; that moves the existing seat and does not take a second one. An Admin stays an Admin on the current email.
- A user who hasn’t accepted yet shows in the list until they sign in to your HubSpot portal for the first time.
Related articles
Section titled “Related articles”Ask the help center
Answers come from these guides, with links to the articles used.
Ask anything about configuring quoting in Quotivity Studio.