

Setting up an approval process
Create a Quote Rule with the Approval outcome, then build a HubSpot workflow that requests approval and publishes the quote.
Overview
Section titled “Overview”An approval process has two parts. First you create a Quote Rule with the Approval outcome so the right quotes move to Pending approval. Then you build a HubSpot workflow that sends the request to the right people and publishes the quote after they sign off.
Build a quote-based workflow whenever your HubSpot portal supports quote workflows — Quote appears as an object when you create a workflow from scratch. Use an app event workflow triggered by Quote Submitted for Approval only if the portal cannot create quote-based workflows. Use Request Quote Approval (v2) and Publish the Quote in either case. The older Request Quote Approval action is deprecated and remains quote-only.
Prerequisites
Section titled “Prerequisites”- An Admin role in Quotivity Studio
- Licensed Quotivity users who will approve quotes (Admin or Sales Rep)
- HubSpot permission to create workflows
Create the Quote Rule
Section titled “Create the Quote Rule”- Create a new Quote Rule. In Quotivity Studio, open Quote Rules and start a new rule. Give it a clear name like “Approval — discount over 20%.” Approvers see the rule name on the review screen.
- Set the conditions that should trigger approval. Add the conditions that
define a quote worth reviewing — for example, a discount above a threshold, a
total over a certain amount, or a specific product or term.
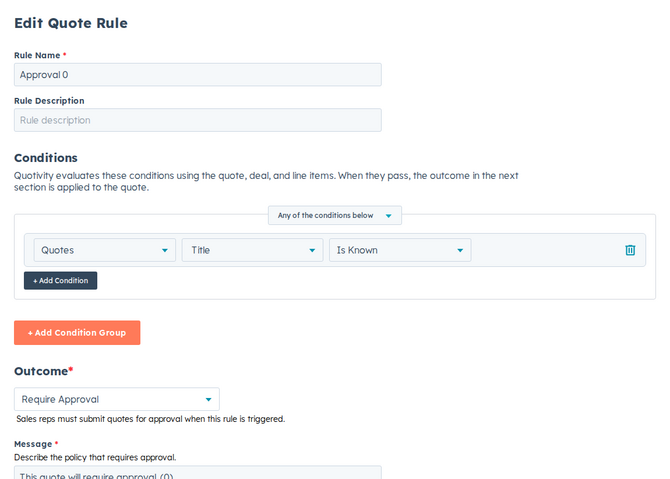
- Choose the Approval outcome. Set the rule’s outcome to Approval so a qualifying quote moves to Pending approval instead of publishing.
- Choose who approves at the rule level. Assign the approval queue that should receive the request. The HubSpot workflow still names the actual approver emails in Request Quote Approval (v2). Using a queue keeps each workflow’s enrollment simple: you filter on the queue instead of re-creating the Quote Rule conditions in HubSpot.
- Decide how multiple approval rules combine (optional). If several approval rules can match the same quote, you can choose to apply only the first matching approval rather than stacking every match.
- Prompt the rep for an explanation (optional). Turn this on if you want the rep to add a short note when they submit. Approvers see that note on the review screen.
- Configure notifications. Make sure your team is told when approvals are requested, approved, and rejected. See Approval notifications via email and Slack.
- Save and activate the rule. Quotes that meet the conditions now wait in Pending approval until a HubSpot workflow requests review and publishes.
Choose a HubSpot workflow type
Section titled “Choose a HubSpot workflow type”Use a quote-based workflow if your portal supports it. Use an app event workflow only when quote-based workflows are not available.
Use Request Quote Approval (v2) in both approaches. The workflow pauses on that action until an approver decides. You can stack several of those actions for multi-stage review. Always put Publish the Quote after every Request Quote Approval action.
| Approach | When to use it | Quote ID | Approval Queue |
|---|---|---|---|
| Quote-based workflow | Your portal supports quote workflows. Enroll quotes when Internal quote status is any of Pending approval | Leave Quote ID blank — the enrolled quote is used | Filter on the quote’s Approval Queue property |
| App event workflow | Required only when the portal does not support quote-based workflows. Starts from the Quote Submitted for Approval app event on the deal | Required. Map it from the event’s Quote ID property | Use the event’s Approval Queue property — it matches the quote’s Approval Queue value |
The app event is associated with the deal, not the quote record, so HubSpot enrolls the deal. That’s why Quote ID is required on both Request Quote Approval (v2) and Publish the Quote. Map it from the event’s Quote ID token the same way on each action — Submit Quote uses that same optional Quote ID field in validation workflows.
The same Quote Submitted for Approval event includes an Approval Queue property. Its value is the quote’s Approval Queue at submission (semicolon-separated if more than one queue matched; empty if the quote has no queue). Use that token to filter enrollment or branch to the right approvers when you cannot enroll on quote properties. If you route different queues to different people and the portal supports quote workflows, a quote-based workflow filtered by Approval Queue is still the simpler split.
Quote-based workflow
Section titled “Quote-based workflow”- In HubSpot, create a quote-based workflow. Go to Automation → Workflows, create a workflow from scratch, and choose Quote as the object.
- Set enrollment. Enroll quotes that meet custom conditions: Internal
quote status is any of Pending approval. Optionally add and
criteria for Approval Queue if each queue should use its own workflow.
Turn re-enrollment on so the same quote can enter again after a
rejection and resubmit.
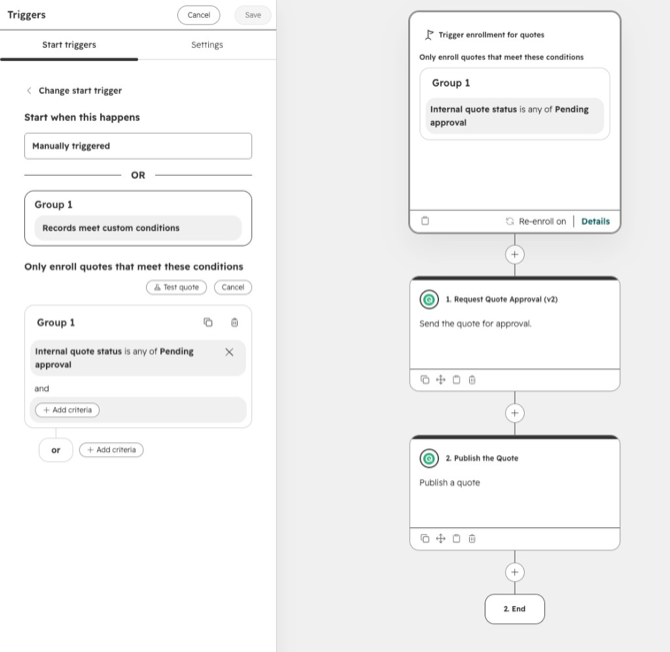
- Set unenrollment (recommended). Unenroll when Internal quote status is none of Pending approval, so a decided or recalled quote doesn’t keep running.
- Add Request Quote Approval (v2). Choose one or more licensed Quotivity
users as approvers. Leave Quote ID blank — this is a quote-based
workflow, so HubSpot already has the enrolled quote. Fill Quote ID only
on non-quote workflows.
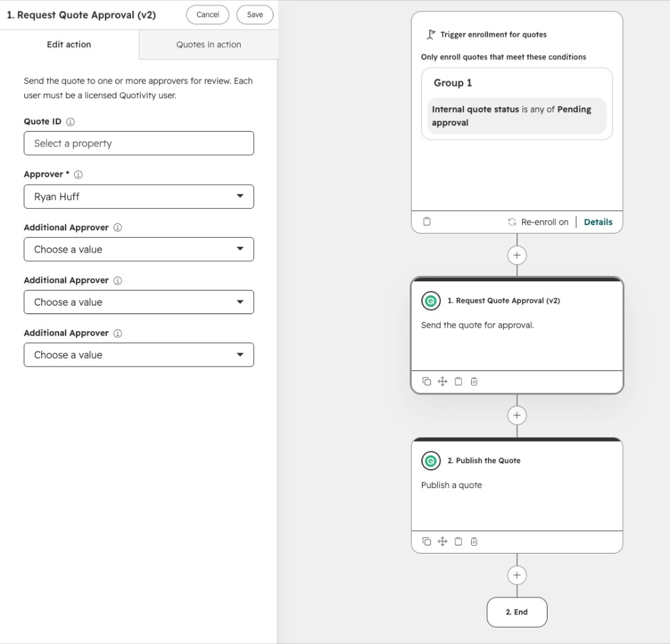
- Add more Request Quote Approval (v2) actions if you need stages. Each action is another required sign-off. The workflow does not move on until that stage is approved. Leave Quote ID blank on each action.
- Add Publish the Quote last. Leave Quote ID blank. This action must sit after every Request Quote Approval action. If you publish first, the approval process will not run as intended.
- Turn the workflow on. Submit a test quote that matches the Quote Rule and confirm the request goes out and the quote publishes after approval.
App event workflow
Section titled “App event workflow”Skip this section if your portal supports quote-based workflows.
Quotivity writes the Quote Submitted for Approval app event to the HubSpot deal when an approval rule holds a quote. The event includes Quote ID and Approval Queue. HubSpot enrolls the deal, so you must set Quote ID on Request Quote Approval (v2) and Publish the Quote. Use Approval Queue from the same event when you need to send different queues to different people.
- Create a workflow. In HubSpot, go to Automation → Workflows and create a workflow from scratch.
- Open App events. In the trigger panel, expand Custom events & external
events and select App events (When a connected app sends data to
HubSpot).
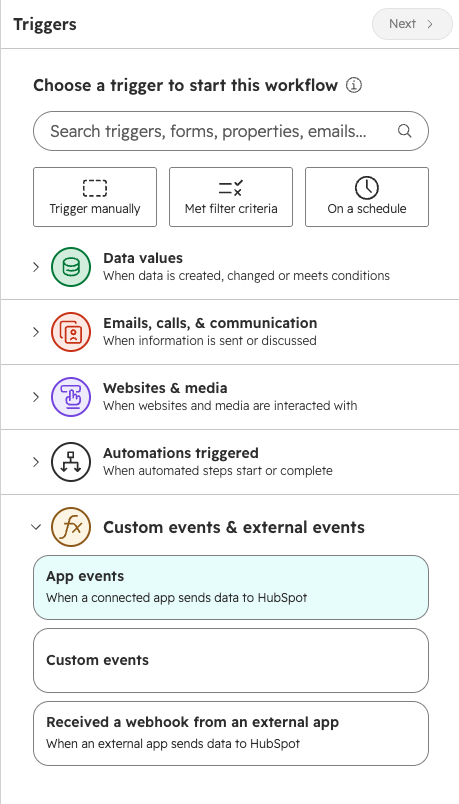
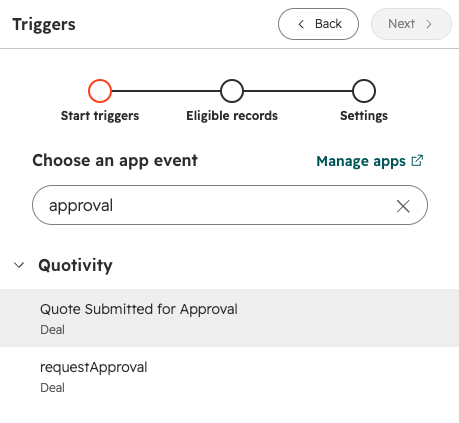
- Choose Quote Submitted for Approval. Search if you need to, then under
the Quotivity app select Quote Submitted for Approval. The event is
associated with Deal. Don’t pick older events such as requestApproval.
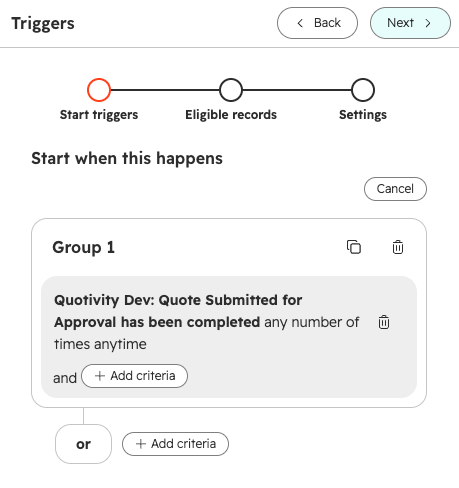
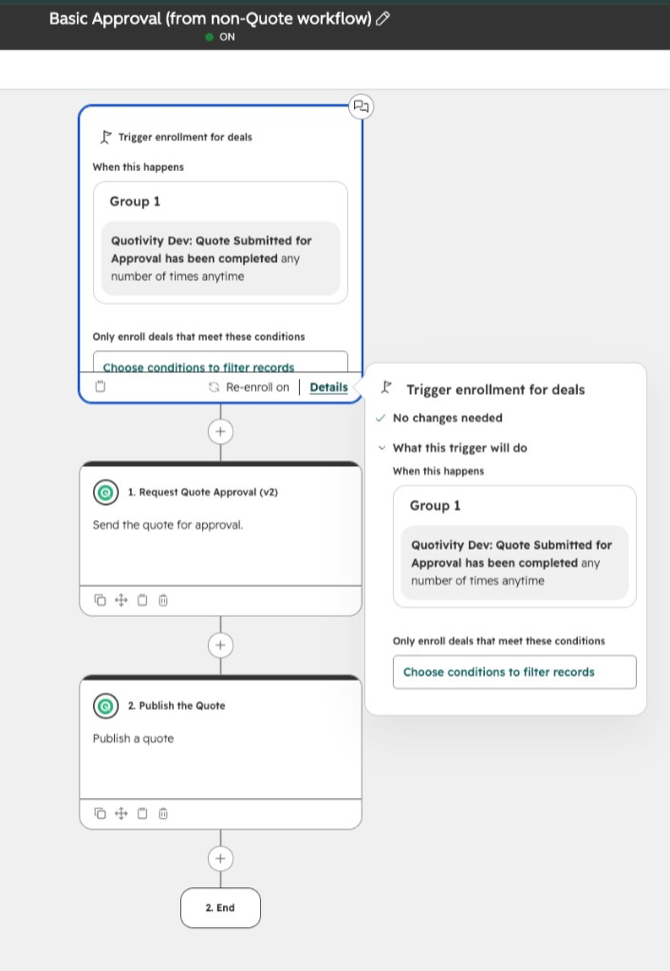
- Confirm the start trigger. HubSpot shows the event as completed any
number of times anytime. The installed app name appears as a prefix — for
example Quotivity: Quote Submitted for Approval has been completed any
number of times anytime.
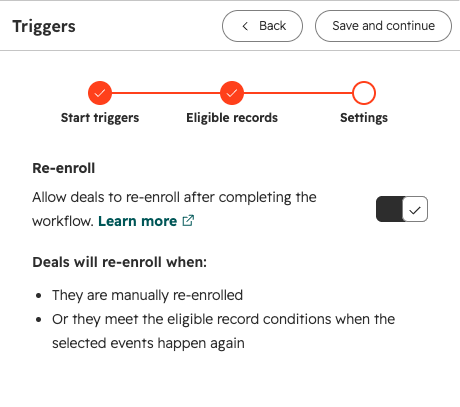
- Turn Re-enroll on. Continue through Eligible records. On
Settings, turn Re-enroll on so deals re-enroll when the event
happens again.
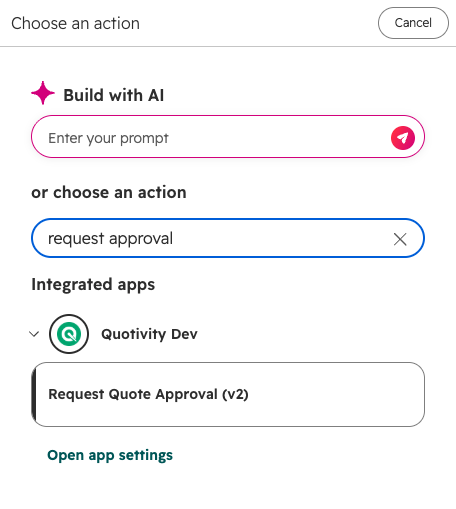
- Add Request Quote Approval (v2). Click + to add an action. Search
under Integrated apps, then under Quotivity select Request Quote
Approval (v2).
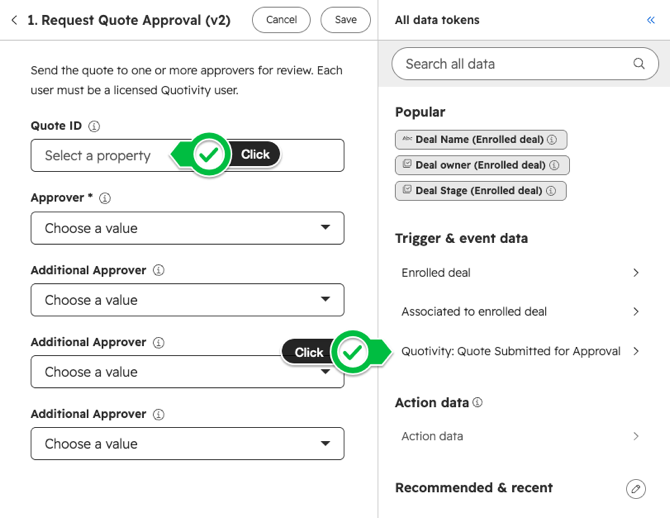
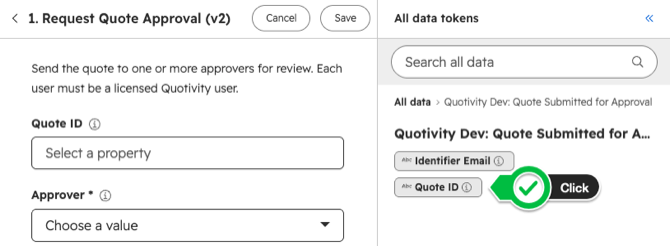
- Set Quote ID from the event. Click Quote ID, then in All data
tokens open Trigger & event data and select Quotivity: Quote
Submitted for Approval. Click the Quote ID token. Do not leave Quote
ID blank — the enrolled record is the deal.
- Use Approval Queue from the same event when you split by queue. Still under Trigger & event data → Quotivity: Quote Submitted for Approval, click the Approval Queue token. That value matches the quote’s Approval Queue property (semicolon-separated if more than one queue matched). Filter enrollment or add a branch so each queue reaches the right approvers. Skip this step if every pending quote uses the same approvers.
- Choose licensed Quotivity approvers. If you add several approvers on one action, any one of them can complete that stage.
- Add more Request Quote Approval (v2) actions if you need stages. Map Quote ID the same way on each action. Each action is another required sign-off.
- Add Publish the Quote last. Find it under Integrated apps →
Quotivity. Map Quote ID from the same event token — the steps match
Request Quote Approval (v2). This action must sit after every Request Quote
Approval action.
- Turn the workflow on. Submit a test quote that matches the Quote Rule and confirm the deal gets the app event, the workflow enrolls, and the quote publishes after approval.
Event enrollment only catches events that happen after the workflow is turned on. It does not backfill quotes that were already pending.
Examples
Section titled “Examples”- Discount guardrail (quote-based). Quote Rule: line item discount over 20%, approval queue “Sales ops.” HubSpot quote workflow enrolls when Internal quote status is Pending approval (and optionally that queue), requests review from sales-ops users, then publishes. Leave Quote ID blank.
- App event fallback. Your portal cannot create quote workflows. Trigger on Quote Submitted for Approval, map Quote ID from the event, optionally filter or branch on the event’s Approval Queue property, request approval, then publish.
- Keep Quote Rule conditions tight so approvers are not flooded.
- Name rules so the trigger is obvious — approvers see the name on the review screen.
- Use Request Quote Approval (v2), not the deprecated Request Quote Approval action.
- Prefer a quote-based workflow whenever your portal supports it. Use the app event path only when quote workflows are unavailable. On that path, Quote ID and Approval Queue both come from the Quote Submitted for Approval event — not from quote properties.
- Never place Publish the Quote before the last Request Quote Approval action.
Related articles
Section titled “Related articles”Ask the help center
Answers come from these guides, with links to the articles used.
Ask anything about configuring quoting in Quotivity Studio.